EDIT COURSE SETTINGS QUICK START VIDEO PART 2
Watch this short video Edit Course Settings Panels 2
EDIT COURSE SETTINGS PANELS
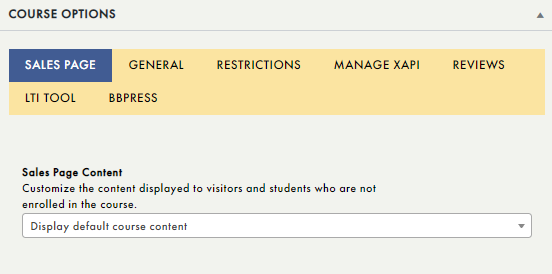
COURSE OPTIONS PANEL
The
Course Options panel provides access to the following tabs:
Sales Page, General, Restrictions, Manage xAPI, Reviews, LTI Tool, and
BBPress (Forums).
These tabs allow you to further customize your course and are discussed in greater detail below.
 Premium and Enterprise account holders will see all the tabs, the Pro account holders will not see the LTI panel.
SALES PAGE
The The Access Plan will be visible to the Premium and Enterprise account holders, the Pro account holders will not see this option.
The
Sales Page tab lets you customize the content displayed to visitors and students who are not enrolled in your course. By default, any visitors to your course will see all default course content. From this tab, you can change this to display custom content.
GENERAL TAB
The
General tab lets you enhance your course by adding featured video or audio:
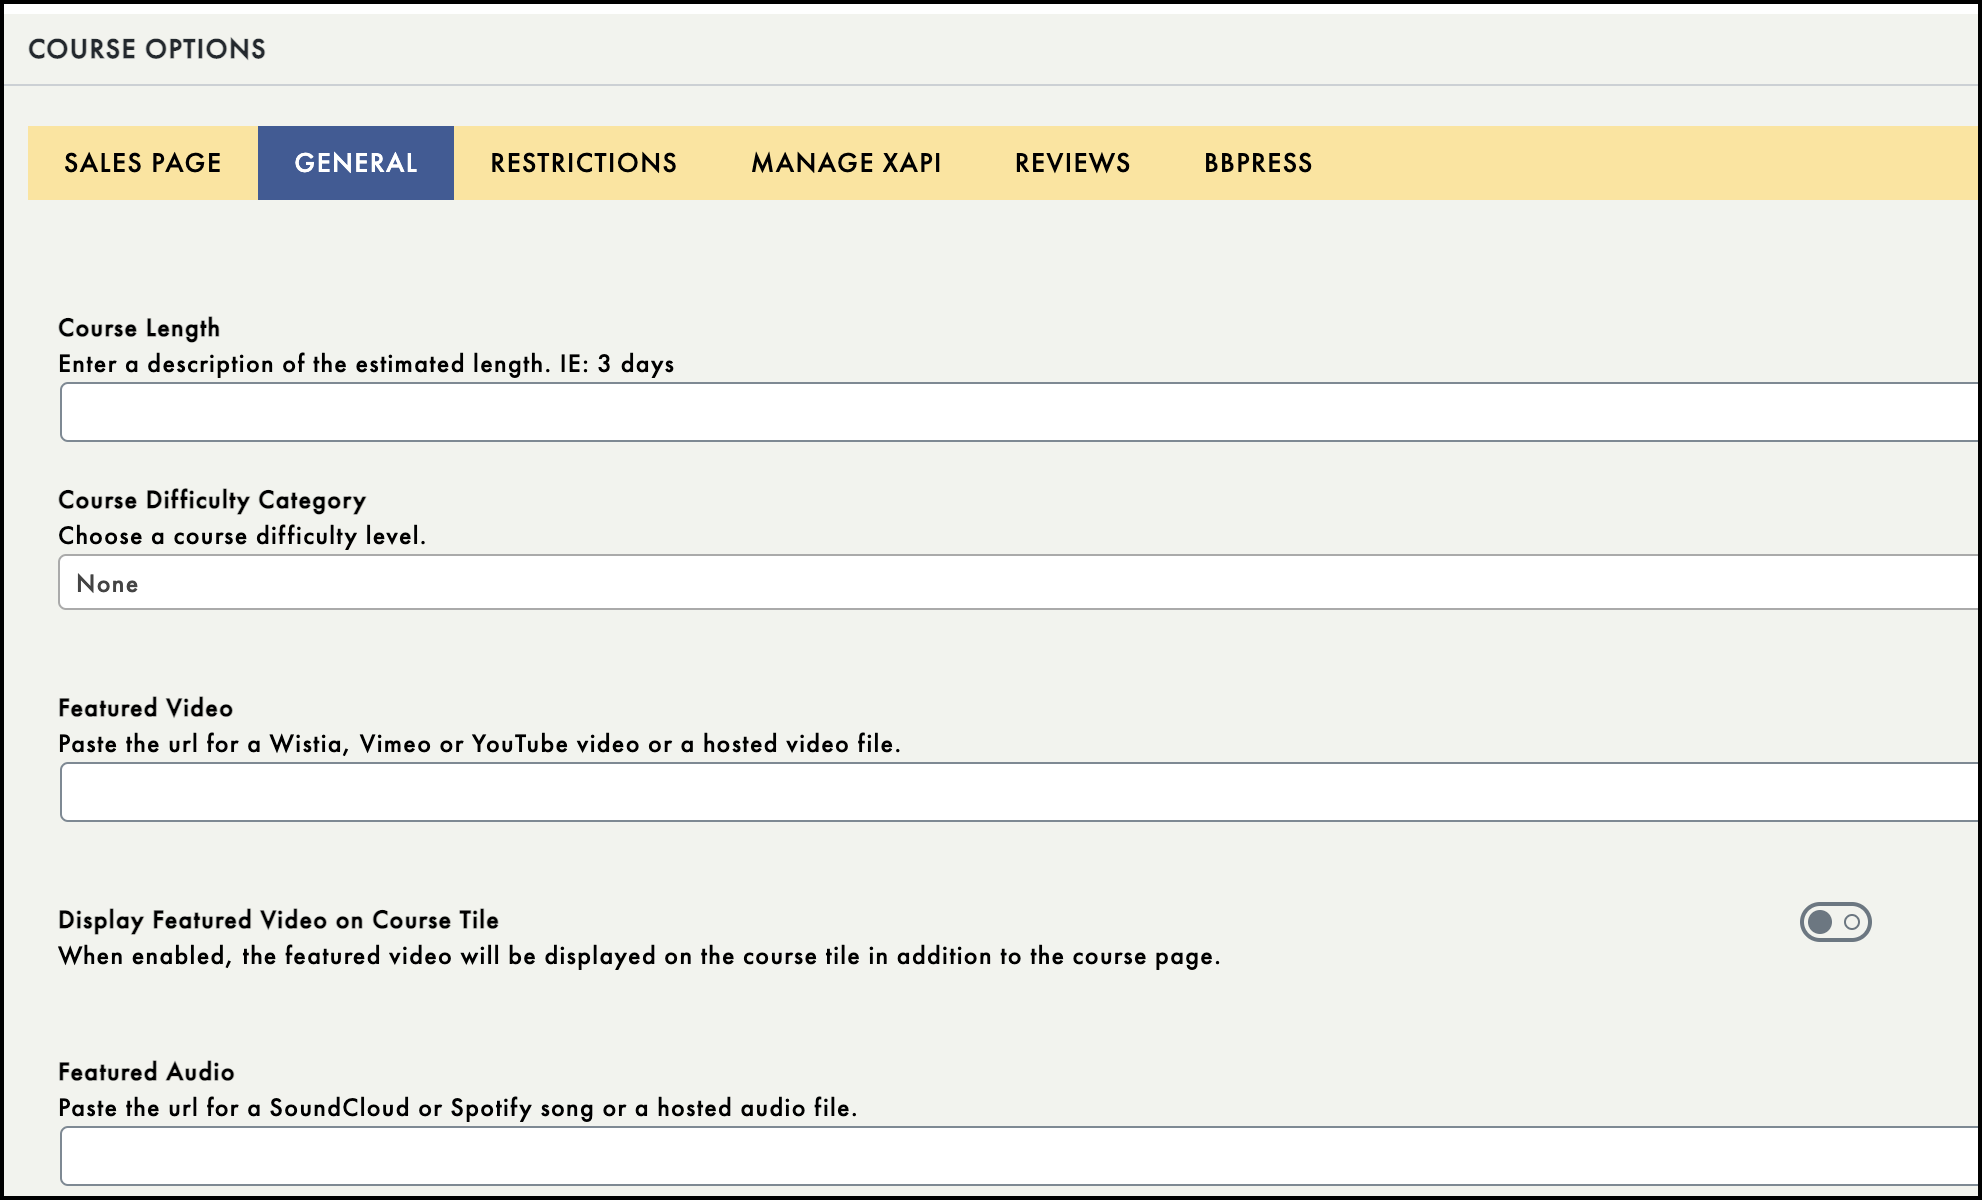
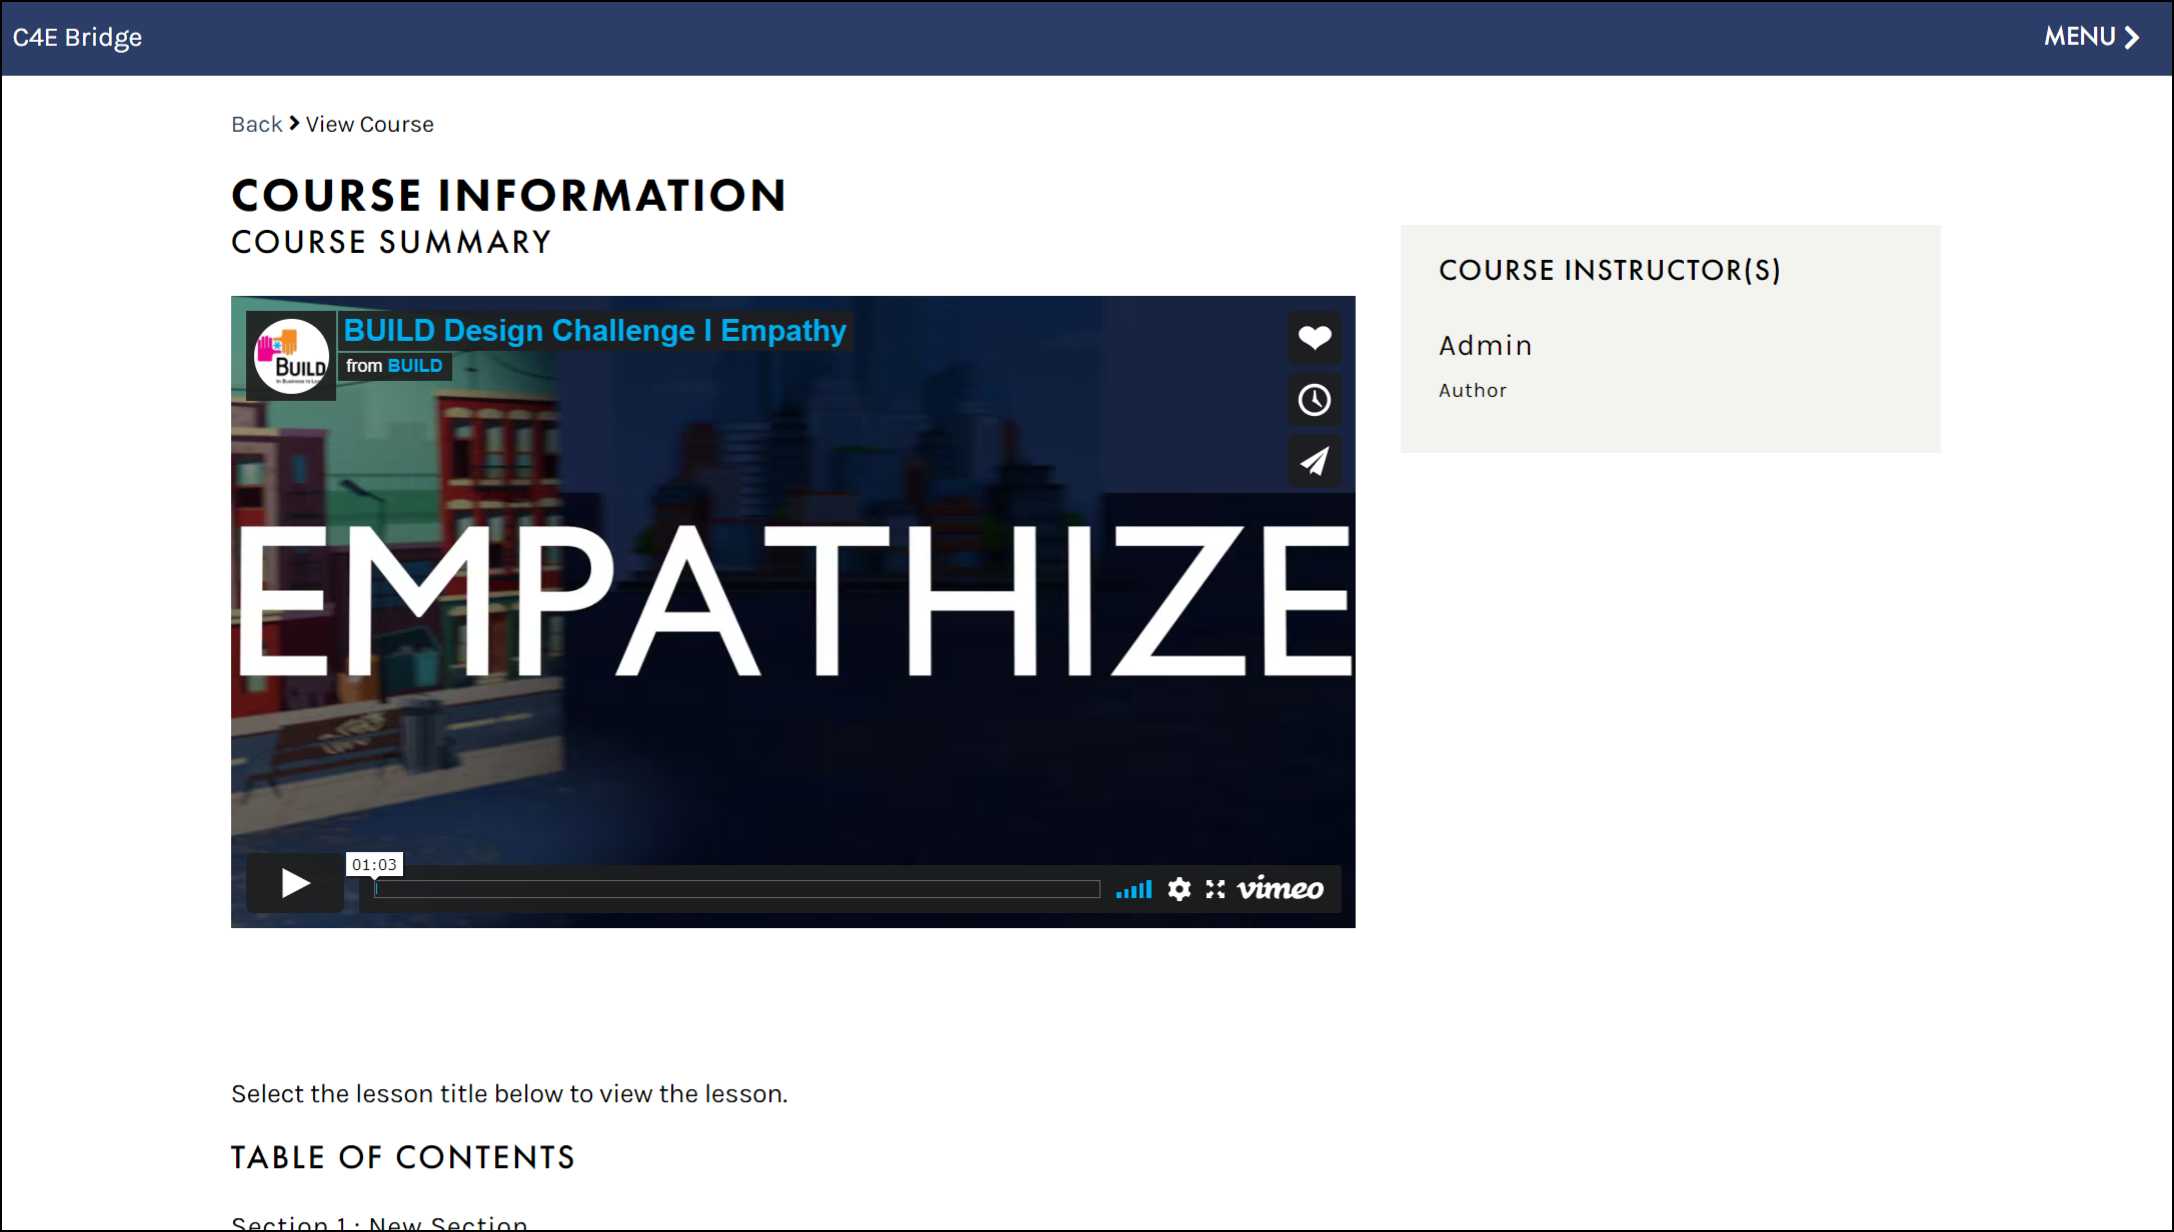
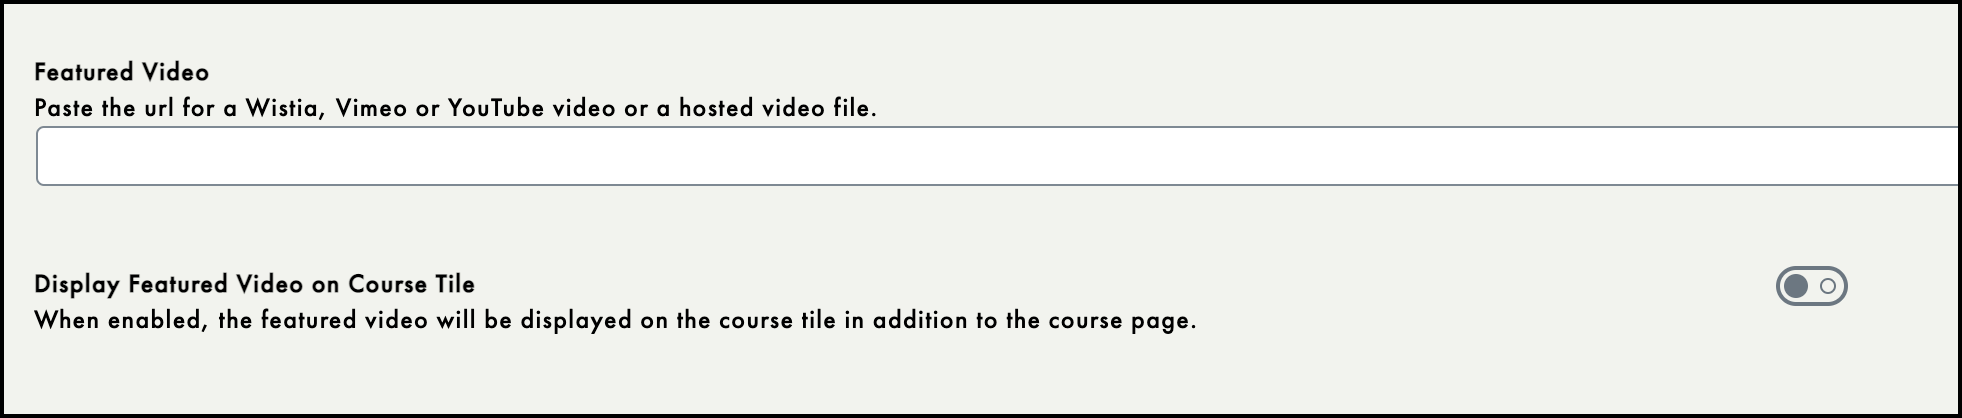
To add a featured video, add the URL for the video you wish to use (this URL can be a Wistia, Vimeo, YouTube link or a hosted video file). This featured video will be displayed on the Course Information page in lieu of a featured image:
You may also toggle the
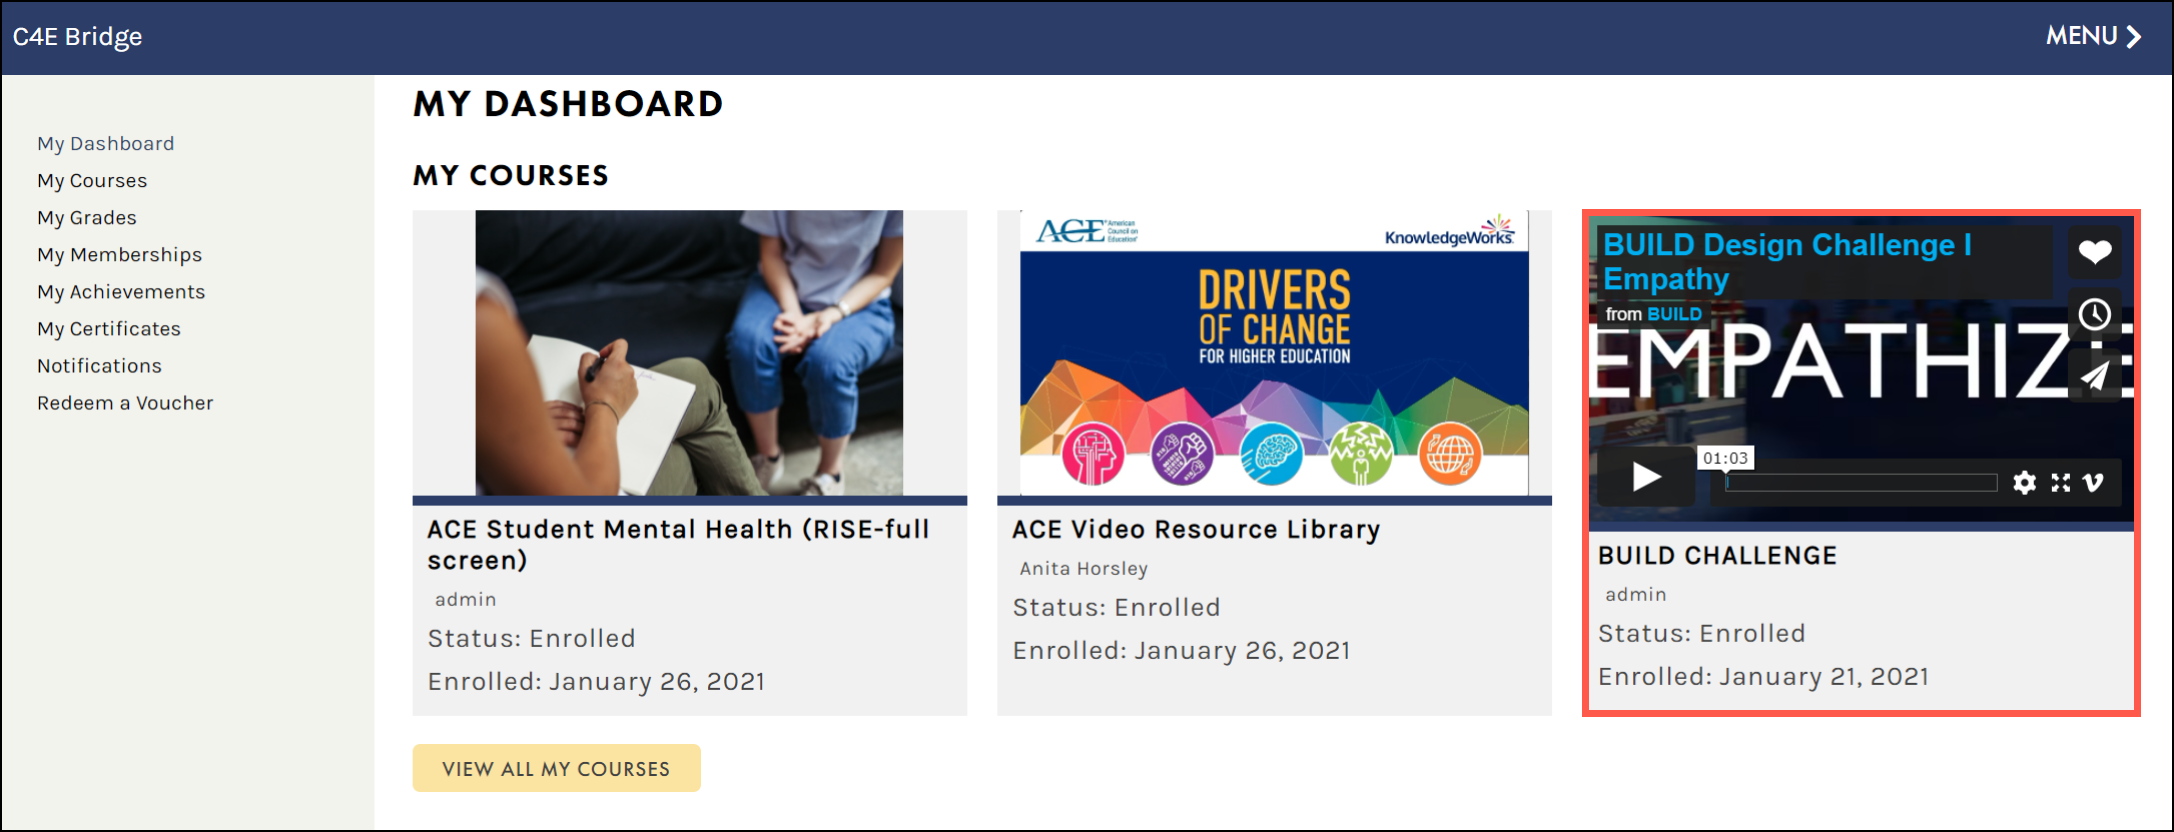
DISPLAY FEATURED VIDEO ON COURSE TILE option to have this video appear as the course thumbnail on students’ dashboards:
With this setting enabled, users can view the featured video within the thumbnail, on the host site, or in full screen mode:
Similarly, to add a featured audio track, simply enter the URL for the track you wish to use (this track can be a SoundCloud or Spotify track, or a hosted audio file):

COURSE LENGTH – You can set up the course length like “30 Days” to let potential students know what to expect in terms of a time commitment.
COURSE DIFFICULTY CATEGORY – You can add a course difficulty level if you wish to organize your courses into levels like “Beginner”, “Intermediate”, “Advanced”, etc.
Instructors (Pro account) can add beginner, intermediate, or advanced course difficulty. LMS Managers (Premium and Enterprise levels) can manage Course Difficulties select Course > Difficulties and fill out the necessary fields.
RESTRICTIONS TAB
From the
Restrictions tab, you set content restriction messages, enable enrollment periods, enable prerequisites, and course capacity.
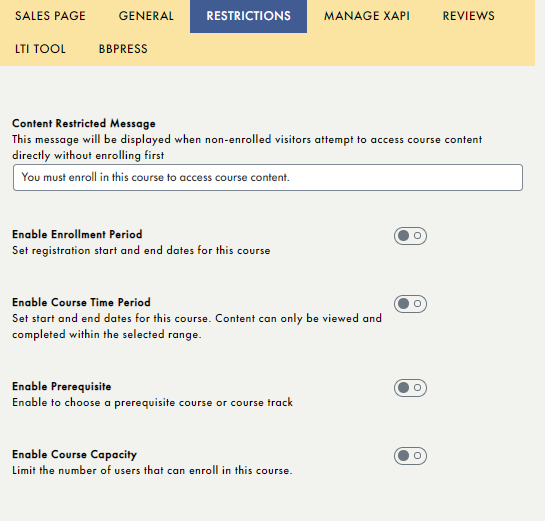
- Set a content restricted message, to be displayed when visitors to your course try to access any course content.
- Enable an enrollment period, by setting your enrollment start and end dates. From this option, you can also set enrollment open/closed messages (using the appropriate text boxes), to be displayed when your course enrollment is open or closed to new users.
- Enable a course time period, by entering your course start and end dates. This will limit course access to within this timeframe.
- Enable a prerequisite, by selecting the desired prerequisite course and/or course track. This will require students to complete specific courses/course tracks before they are able to access any course content in this course.
- Enable course capacity, to limit the number of students accepted in your course. From this option, you can also add a message to be displayed once your course capacity has been reached.
MANAGE XAPI TAB
Experience API (or xAPI, also known as
TinCan) is a specification for learning technology that makes it possible to collect data about the wide range of experiences students have online. xAPI opens the door to flexible learning, allowing your users to learn anywhere and everywhere, and enabling our LRS (Learning Record System) to store all learner information (without having users logging into the C4E
Bridge platform).
For more on adding xAPI packages go to the xAPI section.
The
Manage xAPI tab allows you to Manage your competencies and activities, your H5P Content, as well as uploaded and linked Articulate, Captivate, iSpring or Lectora e-learning courses.
If you are uploading an xAPI package to the
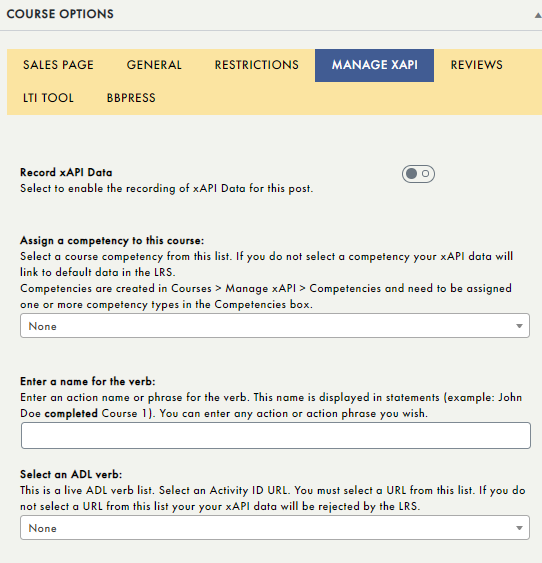
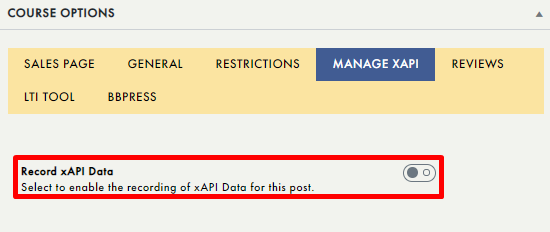
Course Description field to use for course content and you would like to enable reporting and view such data as course completion, quiz results, and more, toggle the
Record xAPI Data on:
From this section you can also assign
competencies that have been previously created by LMS Managers.
LMS Managers (Premium and Enterprise account holders) can create and manage competencies from COURSES > MANAGE xAPI > COMPETENCIES. For more information on adding Competencies, go to the Manage xAPI Section > Competencies.
You can use the
ENTER A NAME FOR THE VERB field to track specific actions using words or phrases:

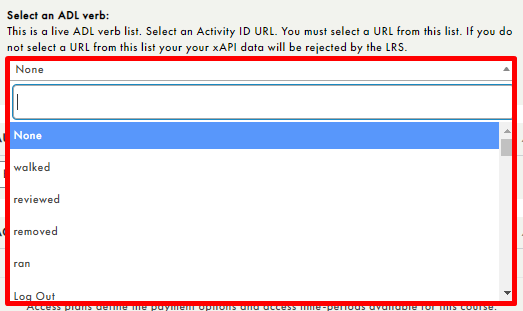
Finally, you can also track using ADL verbs, which reference specific
Activity ID URLs (i.e., viewed or read). Simply select an action from the
LIVE ADL VERB list to use ADL verbs:
REVIEWS TAB
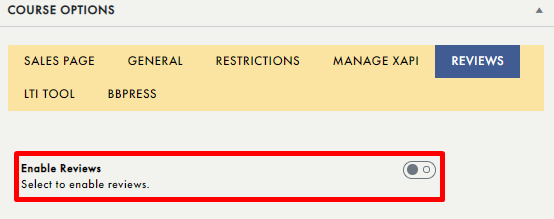
When enabled from the
Reviews tab, users can add reviews of your courses on the
COURSE INFORMATION screen.
Users can find the
WRITE A REVIEW located below after the
course description ( but above the course TOC):

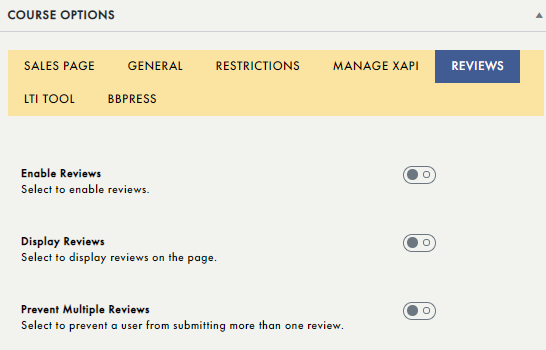
To turn this feature on, toggle
ENABLE REVIEWS on :
From the
Reviews tab, You may also choose to display the reviews to all users (by enabling the
DISPLAY REVIEWS toggle), or limit multiple reviews if desired (by enabling the
PREVENT MULTIPLE REVIEWS toggle).
LMS Managers and Instructors can manage course reviews in COURSES > MANAGE COURSES > REVIEWS. Learn about managing course Rreviews in the Reviews section.
LTI TAB
The LTI panel will be visible to the Premium and Enterprise account holders, the Pro account holders will not see this panel.
Learning Tools Interoperability (LTI) is an education technology specification developed by the IMS Global Learning Consortium, which specifies a method for a learning system to invoke and to communicate with external systems.
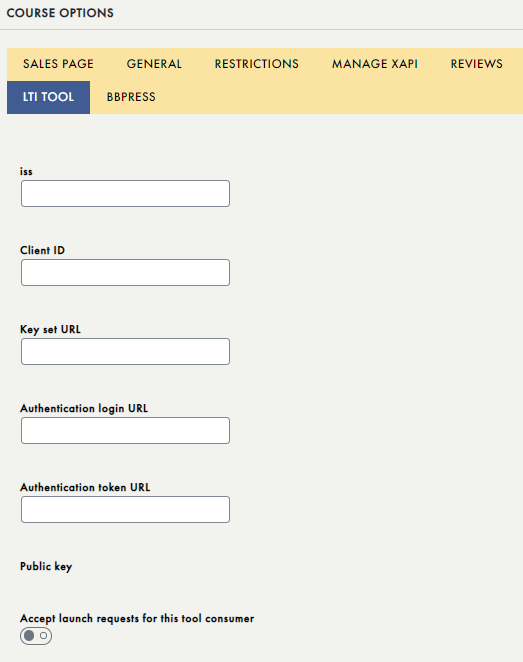
The
LTI Tool tab allows you to enter all of the necessary information to connect to another Learning Management System, directly from the
EDIT COURSE SETTINGS page. If you require assistance with this process, please contact our Support team at
itteam@c4edu.com
BB PRESS TAB
BBPress is an integrated forum software that allows the ability to foster conversation between users who are enrolled in a particular course or added as a part of a specific
membership.
Managing memberships is covered in Admin > Memberships section.

Before you can select a forum to add from the
BBPress tab, you must first create it by accessing
ADMIN > FORUMS.
Once your forums have been created, they will appear in the
SELECT FORUMS DROPDOWN list in the
BBPress tab. Simply select your desired forum from the list:
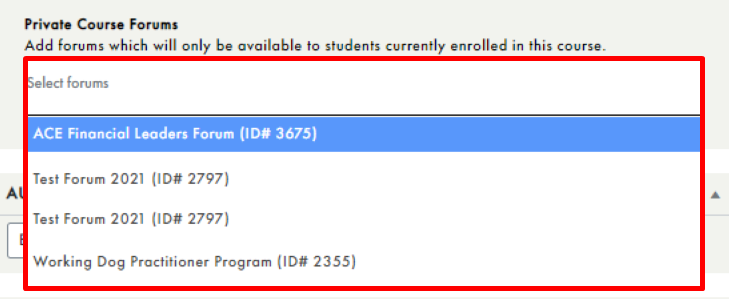
To learn how to add and manage forums, go to the Admin > Forums section.
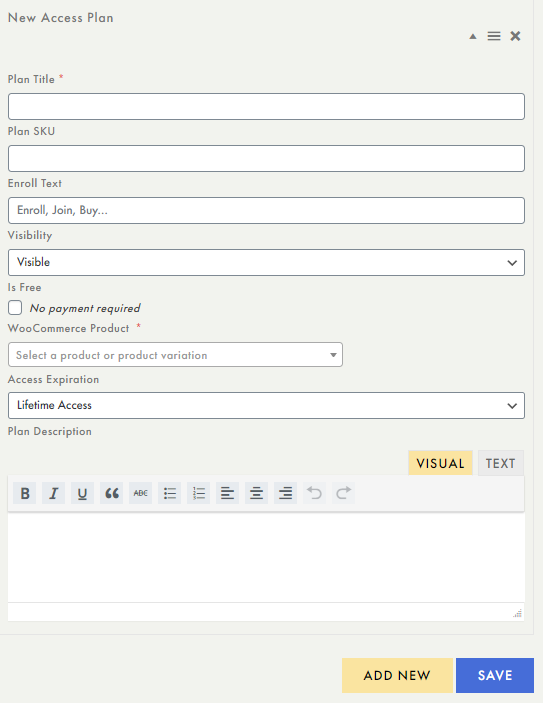
Access Plans
Access Plans will only be visible to the Premium and Enterprise account holders, the Pro account holders will not see this panel.
Beneath
Course Options is the
Access Plans panel, which allows you to define the payment options and access time-periods available for a particular course. Access plans can be available to a particular course or to a specific membership.
To learn more about memberships go to the Admin > Memberships section.

To add an access plan, select
ADD NEW update all necessary information in the text fields, and click
SAVE
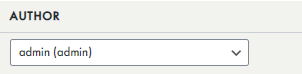
AUTHOR PANEL
Author panel will only be visible to the Premium and Enterprise account holders, the Pro account holders will not see this panel.
The
Author panel allows you to change the author of a specific course. Simply click the dropdown menu and select the desired author.
INSTRUCTORS PANEL
Instructor panel will only be visible to the Premium and Enterprise account holders, the Pro account holders will not see this panel.
From the
Instructors panel, you can view all listed instructors for your course, as well as modify, change, and add additional instructors.
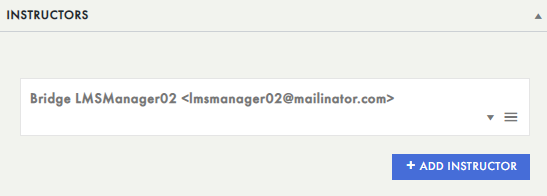
Instructors can also be labelled
visible or
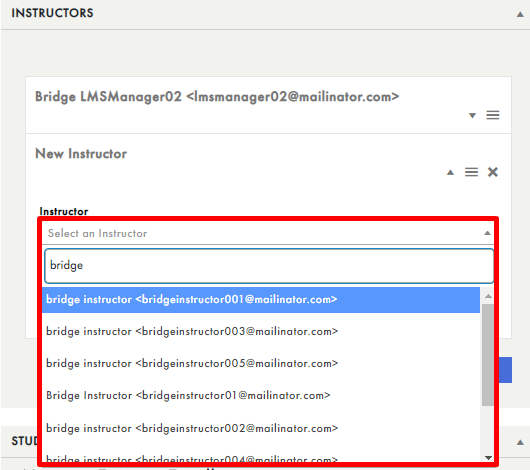
hidden from this panel. To add dditional instructors to your course, select
-+ Add Instructor and click the
SELECT AN INSTRUCTOR dropdown.
You may either type the name of the instructor you wish to add, or browse and select an instructor from the system-populated list, which displays all users who have the
Instructor role:
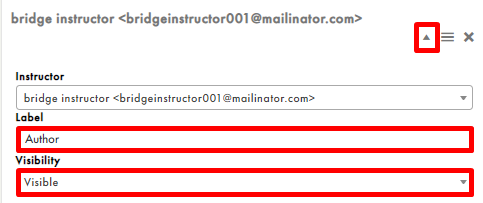
Adjust the
LABEL and
VISIBILITY fields as needed, then click the collapse button (upward facing arrow) once this addition is complete:
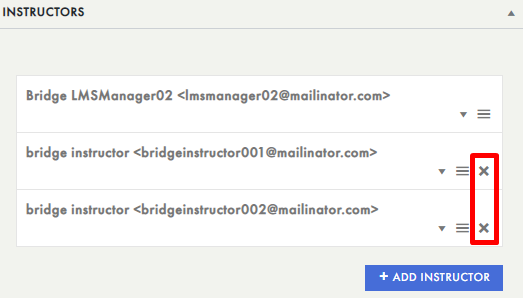
Repeat this process to add any additional instructors. To remove any instructors, simply click the
X icon to delete the user from the
Instructors panel:
STUDENT MANAGEMENT PANEL
The
Student Management panel makes it convenient to manage your students directly from the
EDIT COURSE SETTINGS screen.

However, in order to do so, two things must happen occur:
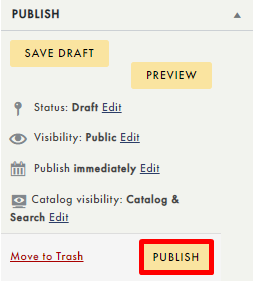
- Your course must first be published. To publish a course, select PUBLISH from the Publish panel (on the right of EDIT COURSE SETTINGS page):
- A user must already have an account on C4EBridge before you can enroll them in a course from STUDENT MANAGEMENT panel
 Best practice to enroll students is to provide voucher key codes to students for specific courses so when they log in they will automatically be enrolled.
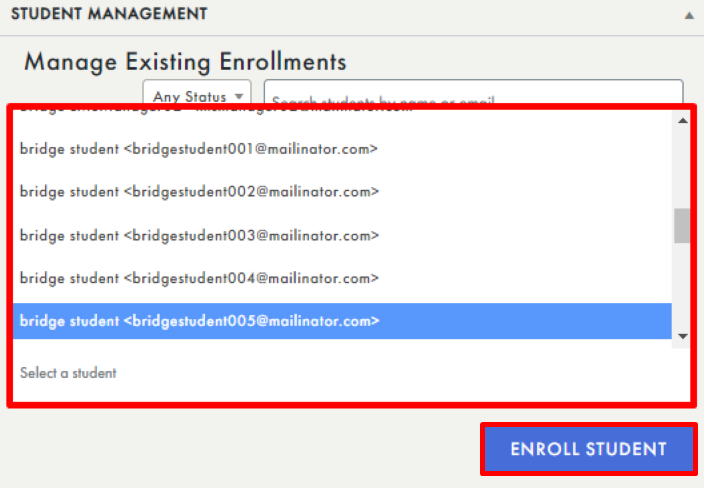
Once your course has been published and users accounts have been created, you can enroll new students by clicking the
SELECT A STUDENT dropdown on the
STUDENT MANAGEMENT panel (under
ENROLL NEW STUDENTS). You may either type to search by name/email, or browse and select multiple students from the system-populated list, which displays all user accounts. Once you have selected your students, click
ENROLL STUDENT:
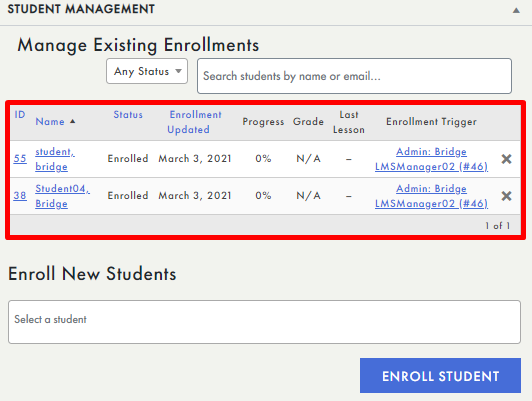
You should now see these students under
MANAGE EXISTING ENROLLMENTS, which displays students’ enrollment status, the date of their enrollment, their course progress and grade, and the last lesson they viewed:
When students are enrolled in a new course, they will not receive email notifications. However, the new course will appear on their dashboards the next time they access their accounts.
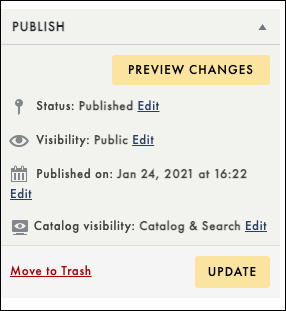
 When making changes to your course settings, be sure to save your progress by selecting the UPDATE button from the Publish We also recommend performing this step periodically to help save your work as you go. To learn about the Publish panel, go to the Publish Panel section.
For additional ways to enroll students and other users, see the Student Enrollment Section.